When you mount a scope to an air rifle, you “hope” that everything lines up right off the bat. In an ideal situation, you would pull a scope out of the box, mount it on the rifle, and your shots would be on paper at, say, 25 yards.

If your shots aren’t on paper, it’s no big deal, is it? Can’t you just make elevation and windage adjustments on the scope itself to correct the problem? Technically speaking, yes you can. Also, technically speaking, you may not want to rely on this method for large adjustments.
Presumably, when you buy a new scope, it should show up on your doorstep with windage and elevation adjustments “somewhere in the middle” or centered. That means that the adjustment turrets should be able to move equal amounts from center in all directions: up, down, left, and right. That allows the most flexibility to get your point of impact right where you want it.
Most of the time, this works out just peachy. You mount your scope, head to the range, and start the time-honored ritual of zeroing the scope. After some carefully placed sighter shots, you figure out how much you’re “off” in terms of windage and elevation. If you like to waste ammo, you can spin the scope turrets a few clicks in the desired direction and try again. Repeat this process. The laws of repetition and chaos theory suggest sooner or later, you’ll stumble on the perfect settings for a proper zero.
Or, if you have a math fetish and want to be efficient, you can measure your “off-ness” on the target, and compensating for the distance to target, work out the number of clicks you need to adjust up, down, right, or left. For example, many scopes have a per-click adjustment of 1/4” at 100 yards. If you’re shooting at 25 yards, then each click will get you one-fourth of that movement, so one click will move your point of impact one-fourth of 1/4”. Stated differently, it’ll take four clicks to move your 25-yard impacts one-quarter of an inch. If you’re two inches off one way, you’ll need to move (8) quarters of an inch, or 32 clicks.
Most of the time when you mount a scope to an air rifle, it only takes a handful of minutes of angle or milliradians (clicks) to get your shot group and crosshairs to coexist in the same location on target. If it only takes a fraction of a spin of the elevation or windage turrets to get zeroed, you’re good to go. The scope will still have plenty of remaining adjustment potential to handle changing distances or compensating for different impact points of lighter, heavier, or different pellet styles.
There are at least two situations where you can get into trouble relying solely on the scope’s internal adjustments: First, some scopes and rifle combinations are just wonky. For whatever reason, the alignment between the two is off and it can take you three or four boatloads of clicks to get your setup properly zeroed. If you’re a break-barrel shooter, you might have a droopy barrel that can bring about this situation. Second, you may want to shoot your rifle at unusual (for the scope and rifle combination) differences. If the rest of the world uses Air Rifle A with Scope B almost always at 25 yards, there’s a good chance the two parts will line up pretty close right off the bat for shooting at that distance. If you like to “lob” pellets from 100 yards with the same setup, and set your zero at that distance, you may also run out of scope adjustment room using only the dials.
One solution that gives you absolute control over your zero and scope adjustments is an adjustable set of scope rings.
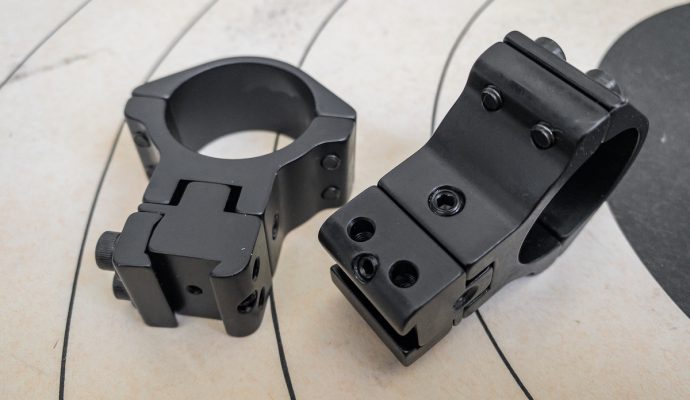
I’ve been tinkering with a set of Sports Match U.K. Fully Adjustable Scope Rings and they neatly solve all the aforementioned challenges.
At risk of butchering the elegant engineering solution that makes these rings special, think of each ring as a three-part affair rather than the standard two. Most rings have a fixed base that mounts to the rifle and a removable “top” allowing you to mount the scope to the rings, making one solid assembly of scope and rings. The Sports Match rings take that base component and split it in two, with a fixed base that mounts to the rifle topped with a “floating” section that supports the bottom of the scope. The “floating” description isn’t exactly correct as locking screws set it in position once you orient the parts as you like.
Here’s how it works. First, mount the base to the air rifle rail as you would with any other rings. Insert the scope and tighten everything down. After checking your initial shot impact points, you’ll likely need to make elevation and windage adjustments. Here’s where the magic starts.
There’s a separate Allen key locking screw that allows access to adjust windage and elevation control screws. Unlocking it allows the two base components of the ring to move every so slightly according to your wished. Loosen the locking screw a quarter turn and use two additional screw adjustments to move the windage and elevation until you’re on target. When everything is right, tighten up the locking screw. Now those two “floating” ring base components are one solid unit again, but aligned to put your shots on target. If you want to “fine tune” just use the scope turrets.
The net-net of all this is your ability to zero your scope without touching the windage and elevation turrets on your optic. That leaves available the full range of adjustment settings for your future use to calibrate for distance, wind, and differing pellet types.
Nifty.
For more info: sportsmatch-uk.com

